In the two previous articles of this series, I discussed the importance of version control and then I went on to give an introduction to Git. I highly suggest reading each article before continuing if you have not already done so (unless you understand version control systems and Git).
As I have noted in my previous articles on this subject, Salesforce is no different than any other production code base when it comes down to it. Changes should not be occurring directly in production and the changes that do get made on sandboxes should be versioned. It is important to have a trail to follow to understand why certain changes/decisions were made. That knowledge is often extremely beneficial in debugging.
The big question now is, how do we go about getting all of these changes in version control? In order to commit any of our metadata into Git, we need to be able to get the metadata onto our file system in XML format. The most common way to do that is simply through an IDE (MavensMate or Force.com IDE), but you can also use the Force.com Migration Tool.
MavensMate
I am going to assume you already have a Project setup in MavensMate if you are looking to utilize this solution. If not, you can follow this tutorial.
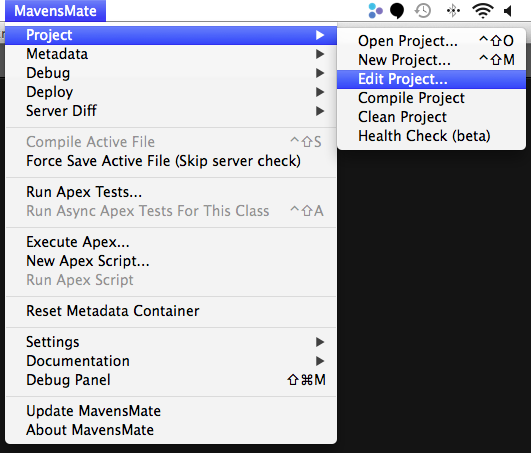
Now that we have established you already have an existing project, you need to get your metadata down on your file system. Both IDEs utilize a package file when syncing metadata between the Salesforce org and your local machine. You can edit that file through the GUI by going through MavensMate > Project... > Edit Project...
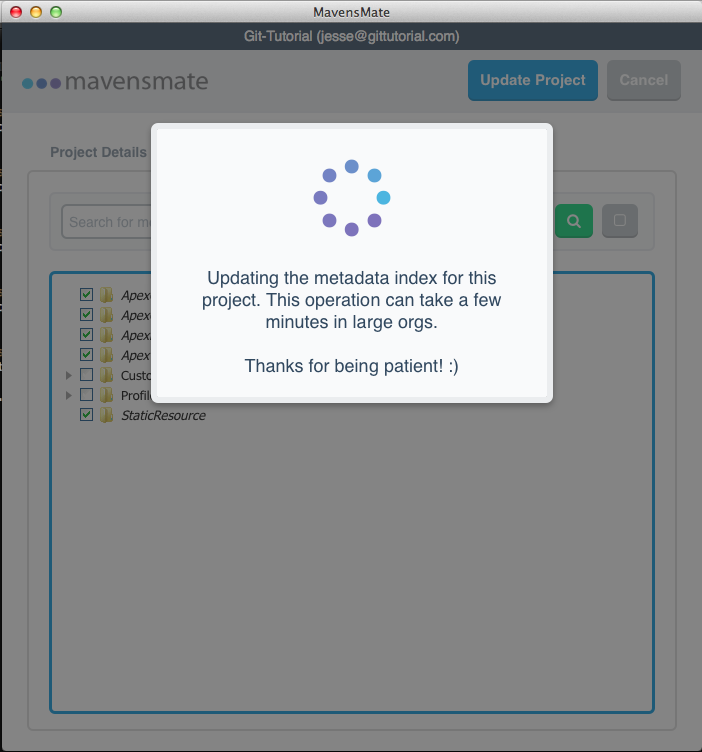
You should immediately see a loading screen while MavensMate refreshes the metadata index for the project. This is the processes of pulling down what metadata you have available in your org.
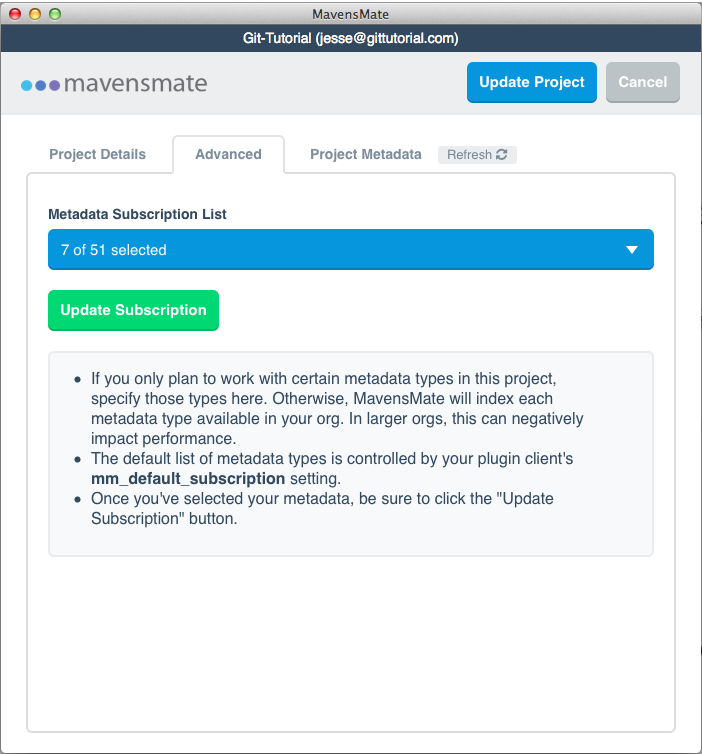
You will want to navigate to the Advanced tab where you can update your subscription list. This is the list of all of the metadata object types you will have available to pull down. For instance, if you have a workflow rule, you will want to select Workflow Rule in the subscription list. This is the only way for workflow rules to show up in your Project Metadata tab.
Once you subscription list is what you need it to be, you can navigate to the Project Metadata tab. It is usually a good idea to refresh if the system doesn’t do it for you. From here, select only the metadata you want to back up. Typically, this is anything you have customized.

When you click Update Project, all of your metadata on your local file system will be refreshed and pulled down from the server.
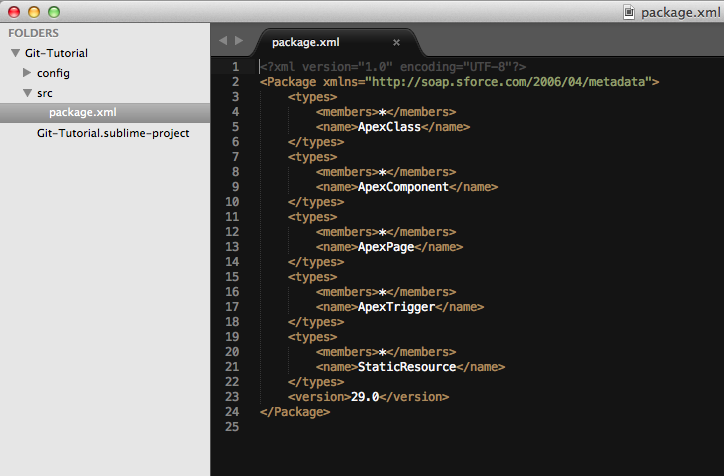
An alternative to using the GUI is to edit the package.xml file directly. The package.xml file will detail out which files to sync. It can be found in the src directory.
I highly suggest utilizing the Salesforce.com Workbench to get the proper developer names for each piece of metadata.
Force.com IDE
Just as with MavensMate, I am going to assume you have a Project set up already. If not, install the Force.com IDE and then set up your Project.
With your Project already set up, you will want to navigate to Force.com > Add/Remove Metadata Components... by right clicking the project name.
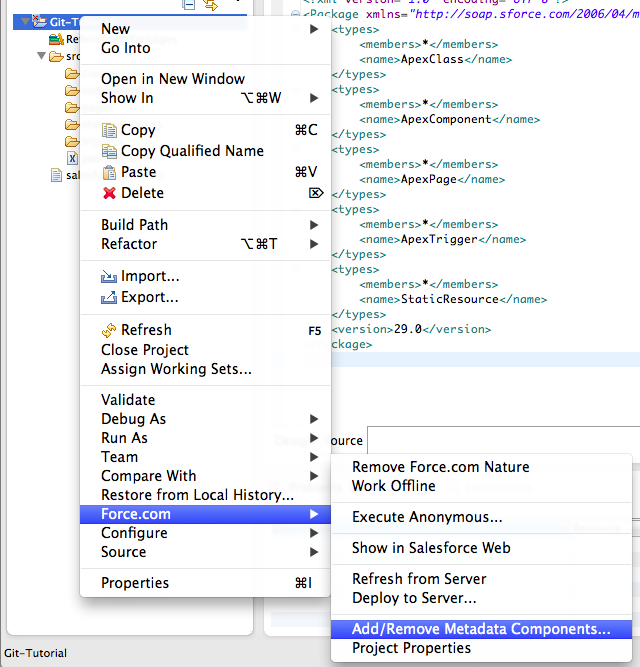
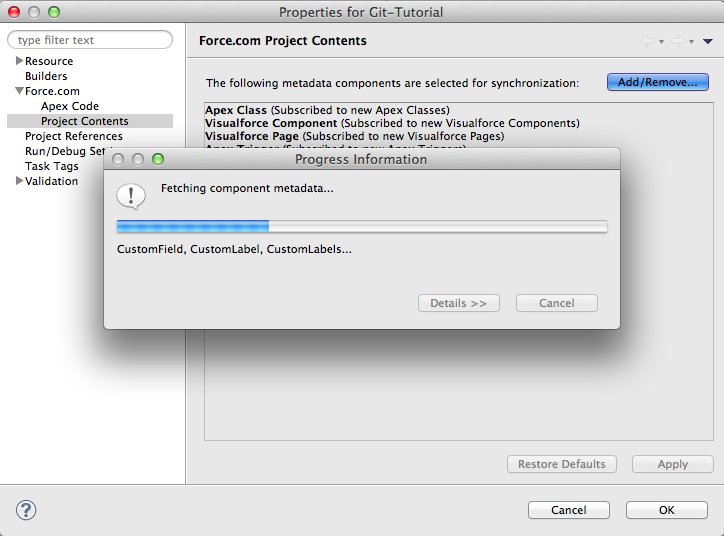
This will pull up the Project Contents page. It will show you which metadata components are already subscribed. To add or remove metadata, click the Add/Remove... button.

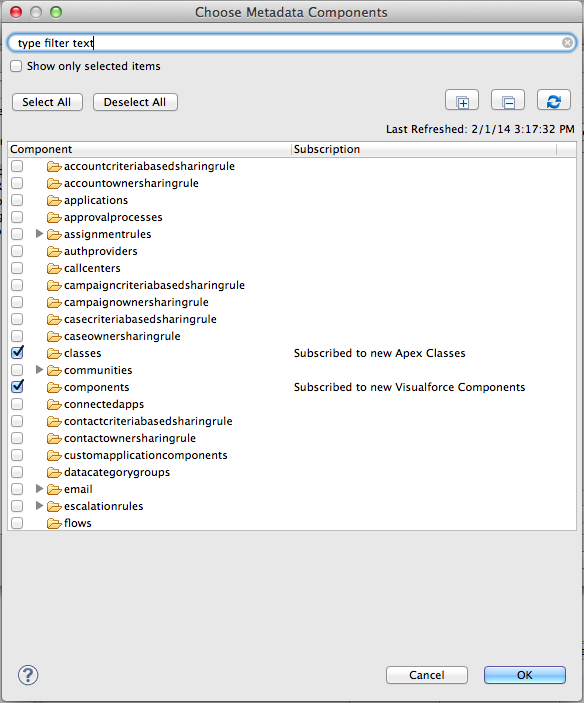
This will automatically refresh the metadata index to give you the full list of metadata components to select.
Once the loading is complete (may take a few moments depending on the complexity and size of the org), you will be able to select the metadata components you wish to back up. As before, this will typically be anything that has been customized.
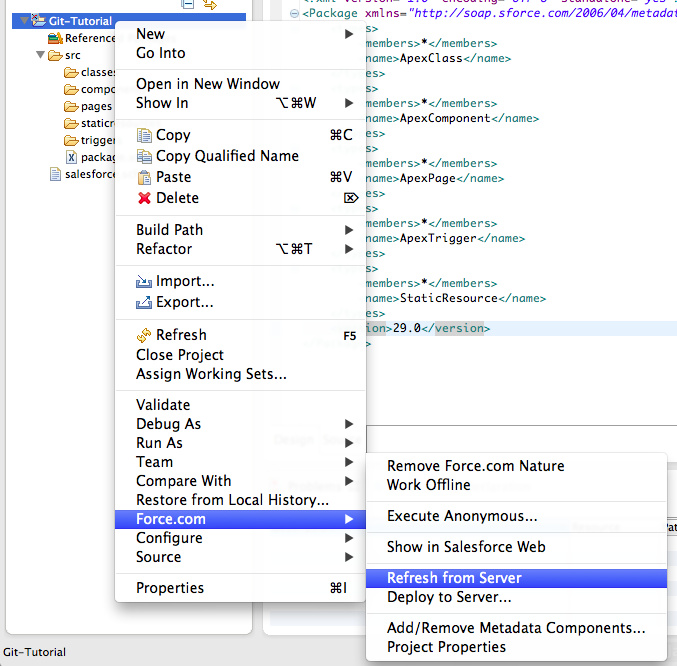
Once you have updated your list, you can close out all of the windows after accepting the changes. To get that metadata onto your file system, you can also select Force.com > Refresh from Server after right clicking the project name.
Force.com Migration Tool
The Force.com Migration Tool is definitely the most advanced way to do this. It doesn’t utilize any GUI and all pulls must be done using XML and a command line. If you understand Ant scripts, this method isn’t too bad. I am not going to dive into this one too much since it requires more setup, but essentially you just need to use the sf:retrieve call that the ant-salesforce.jar provides in conjunction with the proper package.xml file.
Tooling API
I also wanted to briefly mention the new Tooling API. You could technically write your own tool utilizing the retrieve() function. I am not sure if you would be able to retrieve every object, but I figured I would mention it if anyone was ambitious enough to try to tackle this.
Commit, Pull, & Push
Now that we have our metadata down on the file system, we need to push it up to the Git repo that we set up in the last article. You will want to open your command line (I use Terminal on my Mac) and navigate to where you have your project set up. You can utilize cd for this.
[shell]
Jesses-MacBook-Air:~ jessealtman$ cd Documents/Git-Tutorial/Git-Tutorial/
[/shell]
From here, you will want to check the status of your repo using git status.
[shell]
Jesses-MacBook-Air:Git-Tutorial jessealtman$ git status
# On branch master
# Changes not staged for commit:
# (use “git add
# (use “git checkout —
#
# modified: Git-Tutorial.sublime-workspace
# modified: config/.local_store
# modified: config/.session
# modified: config/.settings
# modified: src/package.xml
#
# Untracked files:
# (use “git add
#
# config/.org_metadata
# src/objects/
# src/workflows/
no changes added to commit (use “git add” and/or “git commit -a”)
[/shell]
As you can see, there are a bunch of changes and there are also untracked files. We need to add them to the repo tracking to be able to commit them. We can do that using git add.
[shell]
Jesses-MacBook-Air:Git-Tutorial jessealtman$ git add .
[/shell]
You can check the status again to make sure everything worked properly and as expected.
[shell]
Jesses-MacBook-Air:Git-Tutorial jessealtman$ git status
# On branch master
# Changes to be committed:
# (use “git reset HEAD
#
# modified: Git-Tutorial.sublime-workspace
# modified: config/.local_store
# new file: config/.org_metadata
# modified: config/.session
# modified: config/.settings
# new file: src/objects/Account.object
# modified: src/package.xml
# new file: src/workflows/Account.workflow
#
[/shell]
You are now ready to commit. Make sure you use a good commit message so you have a good reference on what changed if you ever need to look back at the commit history. You can commit your code to your local repo using git commit.
[shell]
Jesses-MacBook-Air:Git-Tutorial jessealtman$ git commit -m “Adding the test Account workflow I added for the Git Tutorial”
[master fdae4de] Adding the test Account workflow I added for the Git Tutorial
8 files changed, 4069 insertions(+), 8 deletions(-)
rewrite Git-Tutorial.sublime-workspace (100%)
rewrite config/.local_store (100%)
create mode 100644 config/.org_metadata
create mode 100644 src/objects/Account.object
create mode 100644 src/workflows/Account.workflow
[/shell]
At this point, you have your code in your local repo. If you come from one of the other version control system, what we just did might seem like a big no-no. You never want to commit something without doing a pull request to ensure there are no conflicts. The important thing to remember here is that you are only committing to your local repo when you use git commit. It is a very important distinction to make and over time it will become more natural, but you are supposed to commit directly to your local repo (because you are the only one who ever commits to it). Now, before we sync our latest commit with remote, we will need to do a pull to make sure that master isn’t ahead of our latest commit. To do this, we will use git pull. Believe me when I say this is an extremely important step. If you skip it and blindly push your changes to remote, you will really annoy your team members by overwriting their changes. Do that too often and you will be forced to wear a dunce hat!
[shell]
Jesses-MacBook-Air:Git-Tutorial jessealtman$ git pull
Already up-to-date.
[/shell]
As you can see above, my local repo is already up to date with remote. This was expected because I am the only developer using it, but as I stated above you should always do this step. It is an extremely good habit to get into.
We can now push our commit to remote. To do that, we will use the git push command.
[shell]
Jesses-MacBook-Air:Git-Tutorial jessealtman$ git push
Counting objects: 21, done.
Delta compression using up to 4 threads.
Compressing objects: 100% (12/12), done.
Writing objects: 100% (14/14), 10.02 KiB | 0 bytes/s, done.
Total 14 (delta 3), reused 0 (delta 0)
To https://github.com/jessealtman-git-test/git-tutorial.git
123963d..fdae4de master -> master
[/shell]
Great job! We have everything now synced up on our remote repo. We now have the assurance to know that no matter what happens to our Salesforce org, we will always have that metadata available. No accidental sandbox refresh will ever bother us again! The whole process at once looks like:
[shell]
Jesses-MacBook-Air:~ jessealtman$ cd Documents/Git-Tutorial/Git-Tutorial/
Jesses-MacBook-Air:Git-Tutorial jessealtman$ git status
# On branch master
# Changes not staged for commit:
# (use “git add
# (use “git checkout —
#
# modified: Git-Tutorial.sublime-workspace
# modified: config/.local_store
# modified: config/.session
# modified: config/.settings
# modified: src/package.xml
#
# Untracked files:
# (use “git add
#
# config/.org_metadata
# src/objects/
# src/workflows/
no changes added to commit (use “git add” and/or “git commit -a”)
Jesses-MacBook-Air:Git-Tutorial jessealtman$ git add .
Jesses-MacBook-Air:Git-Tutorial jessealtman$ git status
# On branch master
# Changes to be committed:
# (use “git reset HEAD
#
# modified: Git-Tutorial.sublime-workspace
# modified: config/.local_store
# new file: config/.org_metadata
# modified: config/.session
# modified: config/.settings
# new file: src/objects/Account.object
# modified: src/package.xml
# new file: src/workflows/Account.workflow
#
Jesses-MacBook-Air:Git-Tutorial jessealtman$ git commit -m “Adding the test Account workflow I added for the Git Tutorial”
[master fdae4de] Adding the test Account workflow I added for the Git Tutorial
8 files changed, 4069 insertions(+), 8 deletions(-)
rewrite Git-Tutorial.sublime-workspace (100%)
rewrite config/.local_store (100%)
create mode 100644 config/.org_metadata
create mode 100644 src/objects/Account.object
create mode 100644 src/workflows/Account.workflow
Jesses-MacBook-Air:Git-Tutorial jessealtman$ git pull
Already up-to-date.
Jesses-MacBook-Air:Git-Tutorial jessealtman$ git push
Counting objects: 21, done.
Delta compression using up to 4 threads.
Compressing objects: 100% (12/12), done.
Writing objects: 100% (14/14), 10.02 KiB | 0 bytes/s, done.
Total 14 (delta 3), reused 0 (delta 0)
To https://github.com/jessealtman-git-test/git-tutorial.git
123963d..fdae4de master -> master
[/shell]
Final Thoughts
The benefit of utilizing either of the IDEs is that this can become a completely non-code related task. It can all be done through a GUI. To supplement those methodologies, you can also use a GUI for Git (although I prefer the command line). I have found that once you know the important Git commands, using the command line is very quick and painless.
After a bit, this all becomes pretty much second nature as well. Once you see the value, you will never want to make any changes without version control.
In my next article of this series, I will focus on the branching aspect of Git.
Enjoy!
